Zero Based Budget Template: Free Download for Excel & Google Sheets
Most budgeting guides hand you a definition and then leave you to figure out the rest. This one does not do that. You will find a free zero based budget template for Excel and a separate one for Google Sheets, two complete real-dollar examples showing the full process from first paycheck dollar to zero, and a clear walkthrough of how to create a zero based budget from scratch. Whether your income is steady, irregular, or somewhere in the middle, there is a section here built for your situation.
What Is Zero Based Budgeting? (And Why Every Dollar Needs a Job)
Zero-based budgeting runs on one formula:
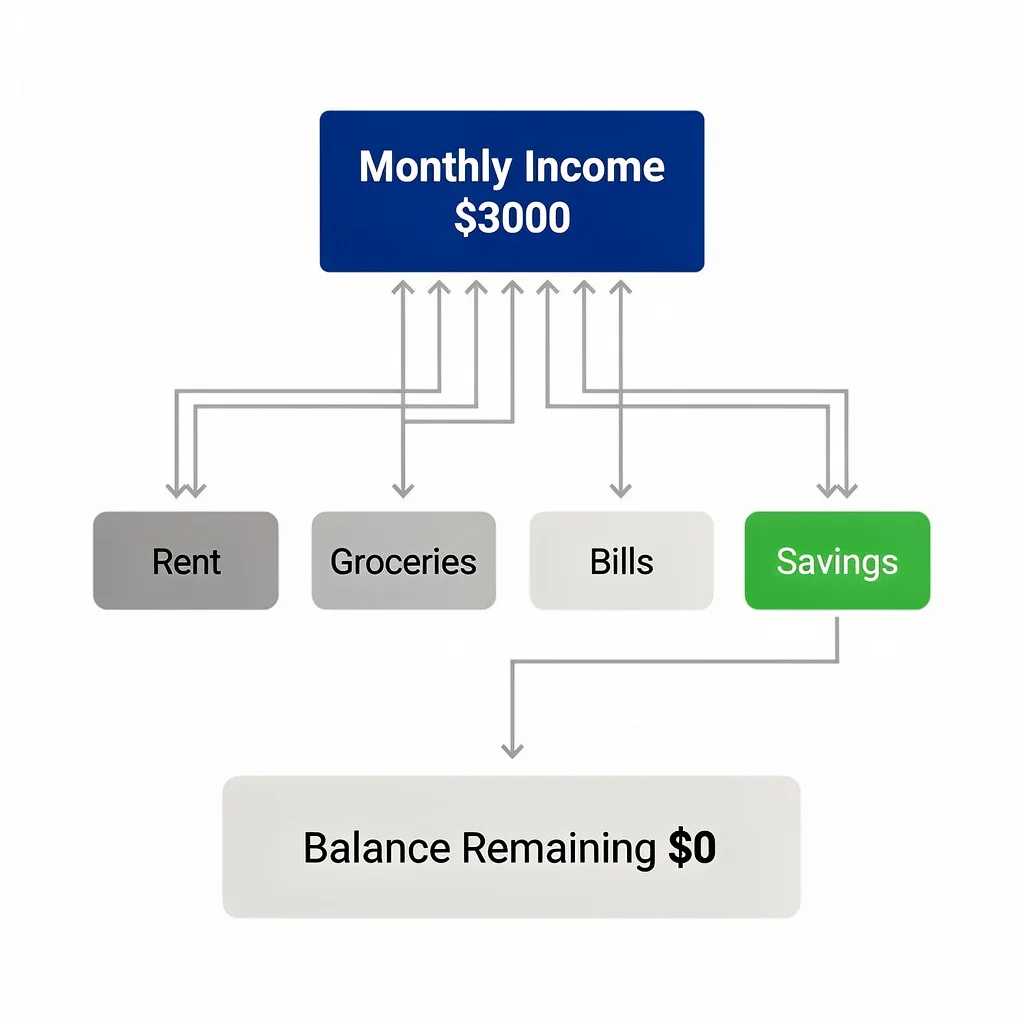
Income − Expenses = $0
Before anything else, I want to address the thing most people get wrong. That zero does not mean your bank account is empty. It means every dollar has a job a specific one, assigned before the month starts. Rent gets a dollar. Groceries get a dollar. The emergency fund gets a dollar. Even your entertainment budget gets a dollar. The math on paper hits zero. Your actual bank account still holds money. The difference is that none of it is floating around without a purpose anymore.
Think of it like a manager handing out assignments to a team. A team member sitting with no task assigned is wasted time. A dollar sitting in your account with no assignment is an accident waiting to happen. Zero-based budgeting ends that.
This method is over 50 years old. Zero-based budgeting was first used in corporate finance in 1970, and companies like Coca-Cola, Kraft Heinz, and Unilever applied it at the organizational level and many continue to today. The reason large companies trust the zero-based budgeting methodology is the same reason it works for personal finance: it forces you to justify every dollar from scratch instead of copying what you did last month. Ramsey Solutions brought this budgeting method into mainstream personal finance, and Dave Ramsey made it the backbone of his entire financial framework. That is not a coincidence. When you stop wondering where your money went at the end of the month because you already decided where it was going at the beginning, the spending plan works.
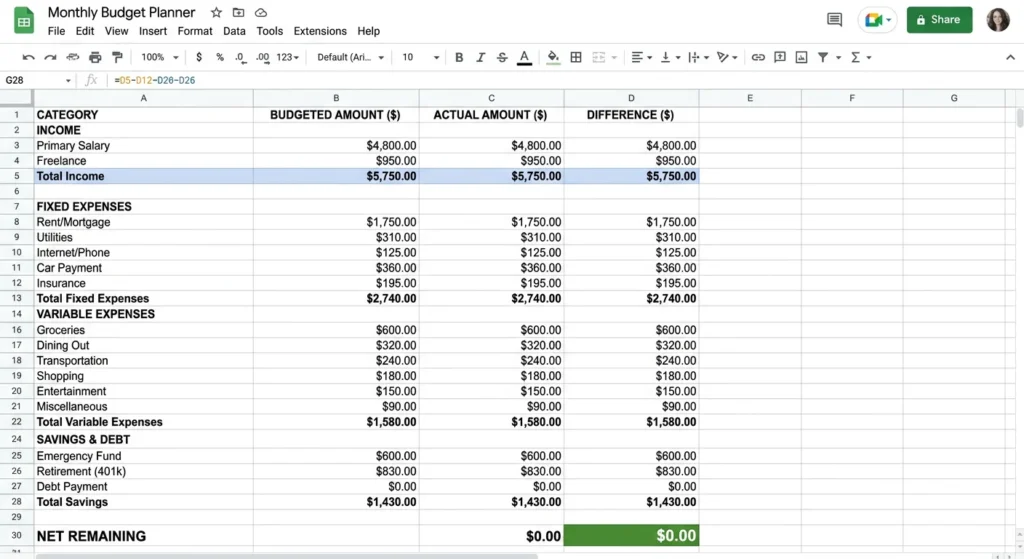
Free Zero Based Budget Template Downloads (Excel + Google Sheets)
I built both of these templates myself and use a version of the Google Sheets one every single month. They have pre-built formulas, organized categories, and an instructions tab so nothing is confusing when you open them. Whether you prefer a structured budget worksheet or a more flexible custom build, these cover both. Both are budget template free downloads no email, no signup, no paid upsell on the other end.
Excel Zero Based Budget Template (Download)
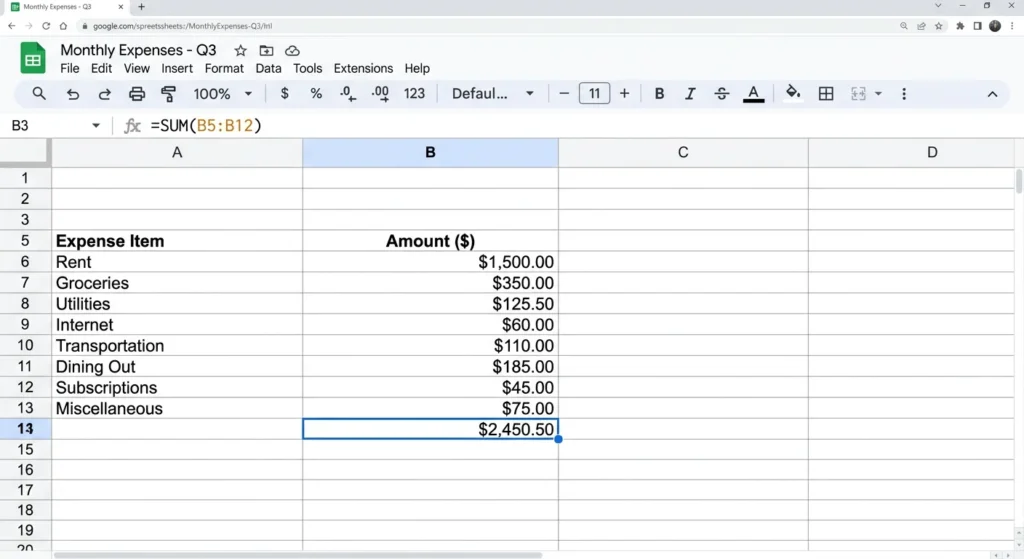
The Excel version of this downloadable budget template works completely offline, which matters if you prefer keeping your financial data off the cloud or budget on a desktop without a reliable internet connection. It opens in Microsoft Excel 2016 or newer with no compatibility issues. The formulas are standard =SUM functions, so adding or removing rows does not break anything. Currency formatting is already applied. And unlike starting from scratch, this 0 based budget template has the column structure and category labels already in place. Open it, fill in your numbers, done.
Google Sheets Zero Based Budget Template (Download)
The Google Sheets version lives in the cloud. That means I can pull it up on my phone right after checking out at the grocery store and update the actual number before I forget it. If you budget with a partner, you can share it and both of you see changes in real time no emailing files back and forth. To get your own copy, click the link, go to File in the top menu, and select “Make a copy.” That creates a private version in your own Google account. Nobody else can see your numbers.
What Is Included in These Templates
Both the Excel budget template and the Google Sheets version have the same features:
- Income section with rows for multiple income sources
- Fixed expense categories for rent, insurance, and subscriptions
- Variable expense categories for groceries, gas, and dining
- Savings and debt payoff goals section
- Sinking funds section for irregular expenses
- Automatic running balance showing how close you are to zero
- Annual totals column and monthly averages row
- Color-coded sections for quick visual scanning
- Instructions tab explaining each section
The structure, formulas, and categories are already built. You are not starting from a blank page. That removes about 40 minutes of setup work and one of the most common reasons people never actually start.
Zero Based Budgeting Example: Real Monthly Budgets with Actual Numbers
Reading about zero-based budgeting is one thing. Watching the full expense allocation process play out with real dollar amounts is something else entirely. Both examples below use real income figures, real expense categories, and real allocation decisions. Look at how every dollar moves from income through zero.
Sample Zero Based Budget #1: $2,820 Monthly Income
This is a $2,820 take-home income. Fixed expenses, variable spending, emergency savings, and five active sinking funds all fit inside it. Here is how.
| Category | Item | Amount |
|---|---|---|
| INCOME | $2,820 | |
| Income | Take-home pay | $2,820 |
| FIXED EXPENSES | $1,675 | |
| Housing | Rent | $900 |
| Utilities | Electric | $110 |
| Utilities | Water | $45 |
| Transport | Car payment | $280 |
| Transport | Car insurance | $130 |
| Phone | Phone plan | $60 |
| Internet | Home internet | $75 |
| Insurance | Renters insurance | $25 |
| Streaming | Subscriptions (kept) | $50 |
| VARIABLE EXPENSES | $740 | |
| Food | Groceries | $380 |
| Transport | Gas | $140 |
| Personal | Personal care | $60 |
| Misc | Miscellaneous buffer | $100 |
| Fun | Entertainment | $60 |
| SAVINGS | $200 | |
| Savings | Emergency fund | $200 |
| SINKING FUNDS | $205 | |
| Sinking | Car maintenance | $20 |
| Sinking | Haircuts | $10 |
| Sinking | Holidays and birthdays | $75 |
| Sinking | Medical co-pays | $50 |
| Sinking | Moving/travel fund | $50 |
| REMAINING | (Goal: $0) | $0 |
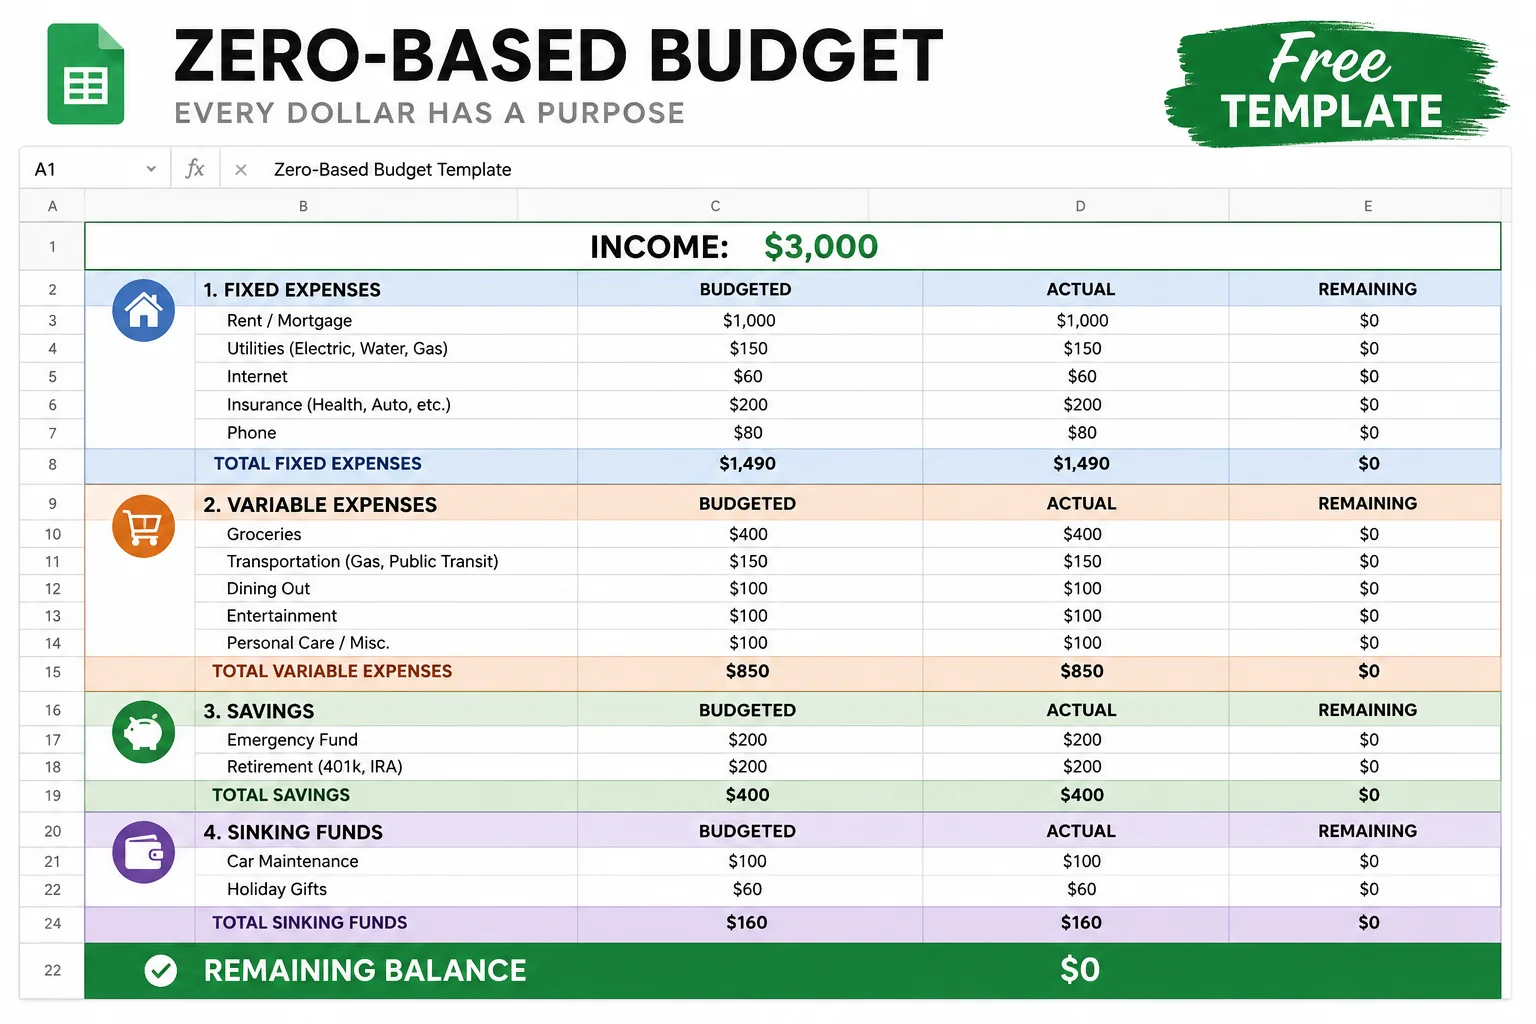
Sample Zero Based Budget #2: $3,000 Monthly Income With Debt Payoff Focus
After covering all expenses in this $3,000 budget, $170 is still sitting unassigned. That surplus does not get left floating. It gets added to the minimum debt payment, turning $200 into $370 of debt payoff in a single month.
| Category | Item | Amount |
|---|---|---|
| INCOME | $3,000 | |
| Income | Take-home pay | $3,000 |
| FIXED EXPENSES | $1,270 | |
| Housing | Rent | $800 |
| Utilities | Electric | $120 |
| Utilities | Water | $50 |
| Utilities | Gas (home) | $20 |
| Insurance | Health insurance | $30 |
| Internet | Internet | $75 |
| Phone | Phone | $25 |
| Transport | Car insurance | $60 |
| Debt | Minimum debt payment | $200 |
| VARIABLE EXPENSES | $960 | |
| Food | Groceries (~$100/week) | $400 |
| Transport | Gas (car) | $120 |
| Food | Dining out (~$50/week) | $200 |
| Fun | Family fun (~$20/week) | $80 |
| Personal | Personal care | $60 |
| Misc | Miscellaneous buffer | $100 |
| SAVINGS | $400 | |
| Savings | Emergency fund | $150 |
| Savings | Sinking funds | $250 |
| SURPLUS ASSIGNED TO DEBT | $370 | |
| Debt | Minimum payment | $200 |
| Debt | Extra debt payment (surplus) | $170 |
| REMAINING | (Goal: $0) | $0 |
How These Budgets Reach Exactly $0
The math here is not complicated. Total income minus every assigned dollar equals zero. In the second budget, $170 was still sitting after all expenses were covered. That amount moves directly to extra debt payment. So instead of paying $200 on that debt this month, the payment becomes $370. The surplus disappears on paper because it got a job. Nothing sits unallocated. Nothing drifts into random spending. That is the entire point of the income minus expenses equals zero formula.
How to Create a Zero Based Budget in Google Sheets (Step-by-Step)
If you already read the Google Sheets section header, you know what this covers: how to create a zero based budget spreadsheet from scratch on a platform you already have access to for free. I have been using a version of this setup for over two years, and the only thing I change month to month is the variable expense amounts. Everything else the structure, the formulas, the section headers stays the same. Building it from scratch takes about 35 minutes the first time. After that, updating it at the start of each new month takes ten, maybe fifteen if I have irregular expenses to account for.
Setting Up Your Spreadsheet Layout
Start with a blank Google Sheet. Leave cell A1 empty and type January in B1, February in C1, continuing across through December in M1. Add a Total column in N1 and an Average column in O1. Those two columns feel minor when you first create them. By month three, they become among the most useful parts of the whole file.
In column A, list every budget category going down the page. Income rows at the top, then expense sections grouped below them. Reading your budget then works left to right — one category per row, twelve months across the columns. To lock the month headers in place while scrolling, click cell B2, go to View, select Freeze, and choose “Up to current row.” Without that freeze, the column headers disappear the moment you scroll below row five. Set it up first and save yourself that frustration.
Creating Income and Expense Sections
I always put savings near the top of the expense section, not at the bottom. That is a deliberate choice. If savings sits at the bottom, it gets funded last meaning it gets whatever is left after everything else takes its cut. Putting it near the top forces the rest of the budget to work around it. The visual placement is not decorative. It is a spending priority built into the layout.
Group rows into sections using blank rows and bold headers: Income, Fixed Expenses, Variable Expenses, Savings, Sinking Funds. Color each section header a different shade so scanning the page takes seconds instead of reading row by row. Expense categorization done visually saves time every month after that.
Writing Formulas for Automatic Calculations
Click the cell in the January column next to your “Total Fixed Expenses” label. Type =SUM(B5:B12), adjusting the row numbers to match where your actual fixed expense rows sit. Press Enter, then grab the bottom-right corner of that cell and drag it all the way to December. Google Sheets updates the column letter as you drag, so each month totals its own numbers without any extra work on your end.
For the running balance, I use =B2-SUM(B5:B40), where B2 holds total income and B5:B40 covers every expense row. That cell becomes your live budget calculator. When it reads zero, the budget is complete and every dollar has its assignment.
Formatting and Color Coding Your Budget
Without color coding, this spreadsheet is just a grid of numbers. I use green for income rows, gray for section headers, and light red for expense totals. Individual line items stay white. That contrast makes it possible to scan the full month in about five seconds. For consistent column widths, highlight the columns you want to resize, right-click, and choose “Resize columns.” To copy formatting without touching your data, use Paste Special and select “Paste format only.” For the currency display, highlight all money cells and click the dollar sign in the toolbar. Every number then shows as $1,200 instead of a plain 1200, which matters more than it sounds when you are scanning quickly.
Adding Annual Tracking and Averages
In the Total column, use =SUM(B5:M5) to sum all twelve months for each row. The Average column divides that total by 12. Those two columns feel minor when you first add them. By month eight, they show patterns you would never catch by looking at a single month. You realize you consistently underestimate gas in winter. You see that grocery spending jumps every November. Monthly financial planning becomes sharper once you have a full year of your own actual data sitting in the same row as your budget.
How to Create a Zero Based Budget in Excel (Step-by-Step)
If you already read the Google Sheets section, learning how to create a zero based budget in Excel takes about five minutes of adjustment. The formulas are identical. The layout is the same. The one real difference is that Excel runs locally on your machine, which means your budget file lives on your hard drive rather than in the cloud. For anyone who prefers keeping financial data off the internet entirely, that matters.
Excel-Specific Setup Tips
Open a blank workbook in Microsoft Excel and build the same column-and-row structure from the Sheets tutorial: month names across the top in row 1, budget categories down column A, formula totals at the bottom of each section. To freeze your headers in Excel, click the row directly below your month labels, go to View in the top menu, and select “Freeze Panes.” That is slightly different from how Sheets handles it so do not go looking for a Freeze submenu the same way. Once set, scrolling down keeps your January through December labels visible regardless of how long your category list gets.
Formulas and Functions in Excel
The =SUM() formula works the same way in Excel as it does in Sheets. Type =SUM(B5:B15) in a totals cell, grab the bottom-right corner, and drag it right across all twelve months. The column letters update automatically. For currency formatting, highlight your number cells, right-click, choose “Format Cells,” and select Currency. Set it to two decimal places and pick your symbol. After that, the spreadsheet reads like a real financial document instead of a raw data table.
Saving and Sharing Your Excel Budget
Save the file as .xlsx to preserve all formatting and formulas. If you want cloud access, upload it to OneDrive and it becomes reachable from any device signed into your Microsoft account. Sharing with a partner works the same way upload to OneDrive, click Share, give edit access. The main difference from Google Sheets is that you have to save and upload manually rather than having changes sync automatically. Worth knowing before you decide which platform fits your habits better.
The 6-Step Process to Create Your Zero-Based Budget
The first time I sat down to build a zero-based budget, I had no clear sequence to follow. I ended up rebuilding it twice because I kept adding categories I had forgotten the first time through. While the core budgeting process applies across different methods, these six steps are the order that actually works for zero-based budgeting specifically.
Start here and follow them through, and you will have a finished budget before you reach Step 6.
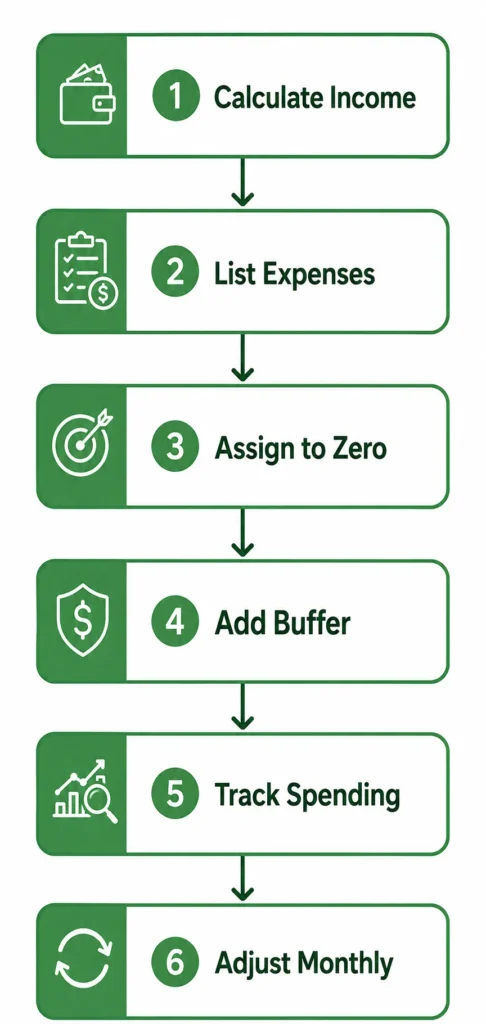
Step 1: Calculate Your Total Monthly Income
Start with take-home pay the number that lands in your bank account after taxes, insurance, and any automatic deductions. List every income source: main job, side work, freelance payments, anything that comes in regularly. Add them all up. That combined total is your starting number for the budget. Budget only on take-home, not gross salary. Your gross is what your employer pays out. Your take-home is what you actually control. And if your employer deducts 401k contributions automatically, those do not count as available income they are already assigned before the paycheck arrives.
Step 2: List All Monthly Expenses
Write down every fixed bill first. I organize mine from most expensive to least, but ordering by due date works equally well whichever method stops things from slipping through. After fixed expenses, list variable costs like groceries and gas using actual past spending as your guide, not optimistic guesses. Then add debt minimum payments and savings contributions as separate line items. Do not skip irregular expenses annual subscriptions, vehicle registration, seasonal costs. Those get their own category called sinking funds, which comes a few sections down.
Step 3: Assign Every Dollar Until Your Budget Balances to Zero
Subtract expenses from income. If there is money left over, it does not drift into your account to be spent on whatever comes up next. It gets assigned. Extra debt payment, a sinking fund contribution, a savings milestone pick a destination and send it there. Keep subtracting until income minus expenses equals zero on paper. The last dollar going to something specific is the moment the budget is actually finished. Not started. Finished.
Step 4: Add Your Buffer Category (The Secret to Real-World Success)
Add a miscellaneous line item to every budget. I put mine at $150. It is not for anything specific it is a catch-all for the small things that show up without warning: a parking ticket, a last-minute birthday card, a $12 replacement part for something that broke. Without this category, every small unplanned expense feels like a budget failure and triggers the urge to abandon the whole thing. That is not a spending problem. That is a missing budget line problem.
Step 5: Track Your Spending Throughout the Month
A budget you build and then never look at again is just a wishlist. The real work happens throughout the month when you record what you spend and check it against what you planned. I do this once a week usually Sunday evening, takes about ten minutes. That weekly budget reconciliation is where you catch overspending while there is still time to reallocate rather than just discovering the damage on the last day of the month. Use your spreadsheet, an app, or a phone note. The tool does not matter. The habit does.
Step 6: Adjust Mid-Month and Start Fresh Next Month
No budget survives first contact with the actual month unchanged. That is not a flaw it is how this works. When something runs over, move money from somewhere else rather than scrapping the plan. And when the month ends, do not copy last month’s numbers into next month. November is not October. January is not December. Car registration, school supplies, holiday costs, heating bills every month carries something the last one did not. Monthly financial planning means rebuilding the budget from scratch each time, which sounds like more work than it actually is once the template is already set up.
Budget Categories Explained (Fixed, Variable, Savings, and Sinking Funds)
Proper expense categorization is what separates a budget that holds together from one that falls apart by week two. Most confusion I see comes from not knowing which category a specific expense belongs in. Is a car payment fixed or variable? Are groceries the same category as dining out? The four below answer those questions.
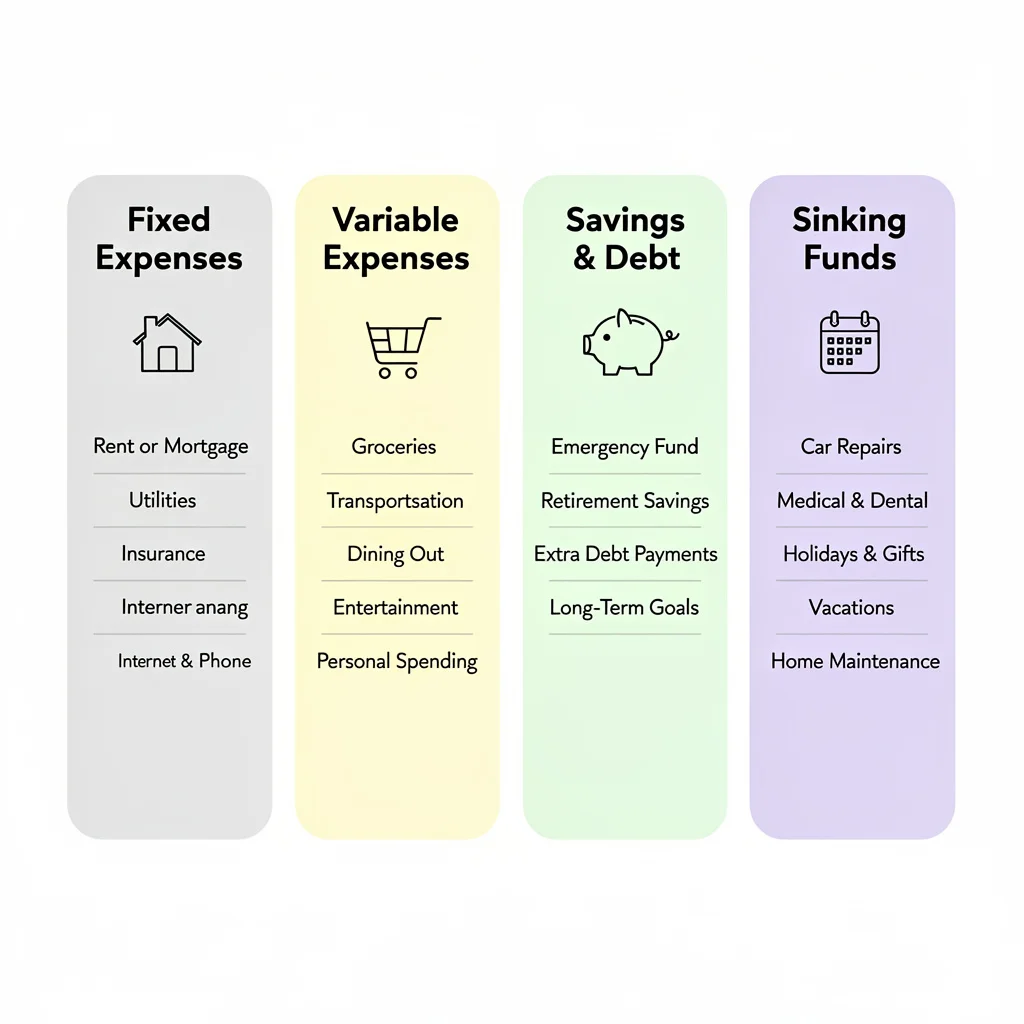
Fixed Expenses Category
Fixed expenses are bills that stay the same amount every month. You know the number before the month starts. Rent, car payment, car insurance, health insurance, phone plan, internet these go in first because there is nothing to negotiate about them. They are non-negotiable. Because the amounts do not change, you can copy this section month to month without rebuilding it. But before you assume you know all your fixed expenses, go through two or three months of bank statements and look for every recurring charge. Most people find at least one or two they forgot about.
Variable Expenses Category
Variable expenses are the ones that shift every month based on what you actually do. Groceries, gas, dining out, personal care, entertainment the amounts change depending on how often you cook, how much you drive, what comes up socially. This is the category that takes the most real-time tracking because the numbers move.
A useful approach is breaking monthly totals into weekly amounts. If groceries are $360 a month, that is $90 per week a number that is much easier to track against a single shopping trip than waiting until the end of the month to see if you stayed under the monthly total. For more detailed strategies on budgeting for groceries specifically, there are techniques that can reduce your food spending by 20-30% without sacrificing quality.
This also helps with cash flow management when your paycheck timing does not line up cleanly with the monthly calendar.
Savings and Debt Goals Category
Savings and debt repayment belong in the budget as real line items, not things that get funded with whatever happens to be left over. I split savings into two groups. Priority savings covers what you genuinely need to build toward: an emergency fund, getting one month ahead on bills, home and car repairs, back-to-school costs. Want savings covers goals that are meaningful but not urgent: vacation, new furniture, a specific purchase you are working toward. Both groups get assigned a number in the budget every single month.
Debt repayment sits here too. The minimum payment is required. Any amount above that is a deliberate choice that shortens how long you carry the debt and how much interest you pay over time. If paying off debt quickly is your primary goal, aggressive debt payoff strategies can help you become debt-free in months rather than years.
Sinking Funds for Irregular Expenses
Most people treat irregular expenses as surprises. Sinking funds turn them into scheduled events. A sinking fund is a budget category where you set aside a small amount each month for an expense you know is coming but does not hit every month. Car maintenance, holiday gifts, birthday presents, annual software subscriptions, vet visits all of these work as sinking funds. The math is just division. Annual expected cost divided by 12 equals your monthly sinking fund contribution. If you spend $240 a year on car maintenance, that is $20 per month. The money is ready when the expense arrives. No scrambling, no pulling from groceries, no budget disruption.
Before You Budget: The 30-Day Tracking Challenge for Beginners
Here is the advice most budgeting guides skip entirely: if you are completely new to this and have no idea what you actually spend each month, do not build your first formal zero-based budget yet. Spend one to two months tracking every expense first.
I know that sounds like a frustrating delay. But a budget built on guessed numbers falls apart in week two. You budget $300 for groceries because it sounds reasonable, then discover you actually spend $480, and suddenly the whole budget feels impossible to keep. That is not a willpower problem. It is a data problem. The budget was wrong before you even started.
Tracking first replaces guesses with actual numbers. The grocery budget that sounded like $300 turns out to be $480 in real life. There are forgotten automatic charges in there. Gas has crept up quietly over several months and you did not notice because you never added it up. All of that financial awareness gets absorbed into your first real budget before you ever write one down, making it far more accurate from day one.
Use whatever tracking method you will actually stick to a notes app, a spreadsheet, a small paper notebook. Record every purchase for 30 days. Categorize loosely. Total each category at the end of the month. That is your real spending baseline. That is where budgeting actually starts.
Monthly vs. Per-Paycheck Budgeting (Choose What Works for You)
Monthly budgeting works cleanly if your income arrives once a month and your bills do not bunch up in odd patterns. But most people are paid bi-weekly, and a monthly budget can feel like it has nothing to do with the $1,400 landing in your account this Thursday. If you have ever built a monthly budget planner and then ignored it because the timing felt completely disconnected from your actual paychecks, per-paycheck budgeting might fit better.
When Per-Paycheck Budgeting Makes More Sense
Paycheck budgeting makes more sense when you are paid bi-weekly, when you live close to the edge each cycle, or when the idea of planning a full month in one sitting feels overwhelming. With bi-weekly pay you receive 26 paychecks a year, which means two months each year arrive with three checks instead of two. Budgeting per paycheck lets you treat those months as built-in boosts for savings or debt rather than accidentally spending the extra. Cash flow management at the paycheck level also helps when a large monthly bill lands awkwardly between two checks.
How to Convert Monthly Budget to Per-Paycheck Format
Divide each monthly budget line item by how many paychecks you receive that month. For most bi-weekly earners, that is two most months. So a $360 monthly grocery budget becomes $180 per paycheck, a $200 monthly dining budget becomes $100. For bills due at specific times — rent on the first, insurance on the fifteenth assign each to the paycheck arriving just before the due date. Paycheck one covers rent and electricity. Paycheck two covers insurance and savings contributions. The goal is that no single paycheck carries all the heavy bills at once. When the large expenses are spread across two paychecks, there is almost never a week where the account hits zero while you are still waiting for the next Friday.
Zero-Based Budgeting with Irregular Income (Freelancers and Gig Workers)
Zero-based budgeting works with irregular income. The adjustment is simple but the mental shift matters. Stop budgeting based on what you expect to earn this month. Budget based on what you earned in one of your slower months. That one change is what keeps a freelancer’s budget from collapsing every time a light week arrives.
The Low-Month Strategy
Pull up your last six to twelve months of income. Find the lowest month, or average your two or three weakest ones. That number is your budget baseline. Build your entire spending plan around that number and nothing higher. The trap most freelancers fall into is budgeting against a good month and then being underwater when a client delays payment or the pipeline goes quiet for three weeks.
When your baseline is a low month, a slow season is just a normal month. Your fixed expenses still get covered. Your savings contribution still happens. Nothing emergency about it. The principles of budgeting on a tight income apply here you prioritize essentials and build flexibility into your plan for lean periods.
What to Do with Surplus Months
When a good month comes in above your baseline, that extra does not automatically drift into lifestyle spending. It gets assigned with the same intentionality as every other dollar. Emergency fund first, until it hits three to six months of expenses. Then the highest-interest debt. Then sinking funds for the slow months you know are coming. Irregular income is either a trap or a tool depending entirely on how you handle the high months. Treated as permission to spend more, every good month disappears and every slow month feels like a crisis. Treated as a boost toward your financial goals, the income swings stop being stressful.
What to Do When You Overspend Mid-Month (Budget Rescue Strategies)
Overspending in a budget category mid-month is not a budget failure. It is a signal that needs a response, not a reason to scrap the whole month. Most people do not know what that response looks like because almost no budgeting guide explains what to actually do after the overage happens. This section does.
The Mid-Month Reallocation Process
When you overspend in one category, move money from another to cover it. The zero balance across the total budget stays intact even while individual category amounts shift around. Say you budgeted $80 for entertainment and hit that number by the third week. Your grocery budget still has $60 sitting in it. Move $40 from groceries to entertainment. Entertainment becomes $120, groceries become $360, and the total budget still hits zero. You made a deliberate trade-off. That is different from just overspending. One is a decision. The other is an accident.
Which Categories to Borrow From
Borrow from discretionary spending categories before touching anything essential. Entertainment, dining out, personal shopping, subscriptions those are the first places to look when you need to cover an overage. Groceries, utilities, and rent should stay as close to untouched as possible. If you find yourself pulling from the same category every single month, the category itself is set too low. That is not a spending control problem. It is a budget number problem, and the fix is adjusting the number permanently rather than reallocating indefinitely.
When to Adjust Your Budget Numbers (Not Just Reallocate)
Two or three months of reallocating out of the same category is the signal to stop moving money and start changing the number. Permanently raise that category. Find something else in the budget to reduce by the same amount. The budget is not wrong because you lack discipline. The budget is wrong because the original number was wrong. Getting the number right is the whole job.
A budget that reflects what you actually spend is far more useful than one that reflects what you wish you spent. However, if certain categories consistently run over because of impulse purchases or unconscious spending, addressing overspending habits at the root level can be more effective than continuously adjusting budget numbers upward.
When You’re in the Red: Emergency Budget Cuts
When your total expenses land above your income during the budgeting process, something has to give. For most people, cutting is the faster move. But cutting the wrong things first just makes daily life harder without actually solving the gap.
The Four Walls Priority Framework
Before cutting anything, name your Four Walls: food, shelter, utilities, and transportation to work. These are non-negotiable. They keep your household functional and your income stream intact. Everything else gets evaluated after these four are funded. Pay rent or mortgage first. Keep the electricity and water on. Make sure the house has food. Keep the means to get to work. Those four covered, you have a foundation to work from. Everything above those four is a candidate for cuts.
Orange Categories to Cut First
With the Four Walls funded, go through every non-essential expense. These are what I call orange categories things that belong to your current lifestyle but are not keeping your household running. Streaming services, gym memberships, dining out, hobby subscriptions, premium app plans. For each one, ask three questions: Am I using this regularly? Can I live without it for 90 days? Is there a cheaper version? For a more comprehensive approach to identifying cuts, strategies to reduce monthly expenses cover both obvious and hidden cost reduction opportunities.
A car payment on an expensive vehicle is worth examining here too. If selling it and buying something more affordable frees up $250 a month, that single decision can close a significant budget gap.
When Cutting Isn’t Enough (Increasing Income)
If you cut every non-essential expense and the budget still does not balance, the problem is not your discretionary spending. It is your monthly income. No amount of frugality closes a gap that is structurally too wide.
Part-time work, freelance projects, selling things you no longer use, negotiating a raise all of these attack the problem from the income side. If you’re in this situation, the techniques for managing an extremely tight budget can help you survive financially while you work on increasing your income. When I see a budget that will not balance no matter what gets cut, the conversation always ends up at income. That is where the actual room to fix it lives.
The Hidden Budget Killer: Automatic Subscriptions Audit
Go through your last three months of bank statements and add up every automatic charge. Not just the obvious ones. Every recurring charge including apps you downloaded once, services that renewed quietly, and subscriptions you meant to cancel months ago. The total tends to be higher than people expect.
How to Find All Your Subscriptions
Pull up the last two to three months of bank and credit card statements. Go line by line and flag every recurring charge. Streaming services, app subscriptions, cloud storage, fitness apps, news services, subscription boxes, domain renewals all of it. Write each one down with its monthly cost, then total the list. Most people land somewhere between $80 and $150 a month in subscriptions when they actually count them. Some land well above $200. That is real money sitting in services they barely use.
The Keep-or-Cancel Decision Framework
For each subscription, answer three questions. Did I open or use this in the last 30 days? Does it justify its monthly cost? Would I actually notice if it disappeared tomorrow? If any answer is no, cancel it. A streaming app you open twice a month at $16.99 is costing you over $200 a year. A fitness app opened three times since you downloaded it is costing you the same as a tank of gas every month. Cancel the ones that fail the test. Redirect that money anywhere more useful.
Cash Envelopes + Zero-Based Budgeting (The Hybrid Approach)
Zero-based budgeting handles the planning side well. Where it can break down is execution specifically for categories where digital payments make it too easy to lose track of what you have actually spent. A card swipe feels like nothing. Handing over cash from a labeled envelope feels like something. That psychological difference is exactly why I combine both methods for specific spending areas.
When Cash Envelopes Make Sense
Cash envelopes work for categories where you consistently overspend despite having a budget. Dining out, groceries, personal shopping, entertainment the usual suspects. The mechanism is simple and effective. When the envelope is empty, that category is closed for the month. No tap-to-pay option sitting in your pocket. No “just this once” because the physical cash is gone. Digital payments feel abstract because nothing visibly decreases when you use a card. Watching real money leave your hand in a store hits differently. That difference in how spending feels is exactly why cash works for categories where budget accountability has failed before.
Setting Up Your Hybrid System
Keep fixed bills fully digital and on auto-pay. Rent, utilities, insurance, subscriptions those run themselves. For two or three variable categories where you consistently go over, pull the budgeted amount out in cash at the start of the month and put it in a labeled envelope. Grocery envelope. Dining envelope. When an envelope empties, that category is closed until next month. Borrowing from another envelope is allowed only as a formal reallocation decision not a casual grab. Running a hybrid system means you keep the structure of zero-based budgeting everywhere while adding physical spending limits exactly where you have historically needed them most.
Your First 3 Months: What to Expect (The Learning Curve)
Your first budget will be wrong in multiple places. That is not a problem with you or the method. It is just how Month 1 works. The goal is not to nail it perfectly the first time. The goal is to learn enough in Month 1 to make Month 2 better, and enough in Month 2 to make Month 3 actually work.
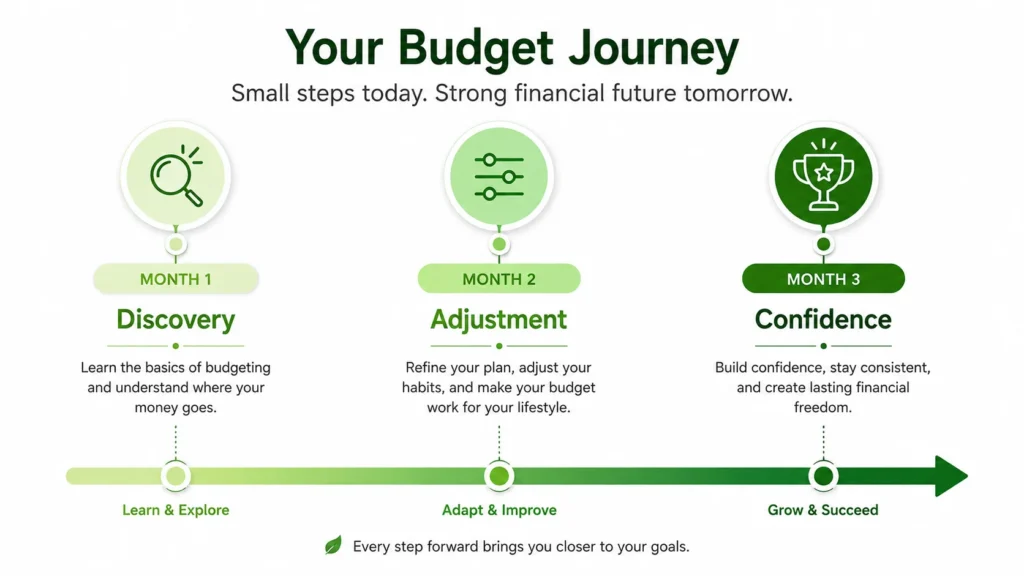
Month 1: Discovery (Nothing Will Go According to Plan)
Month 1 is a data collection month, not a performance month. Expect wrong numbers. Expect forgotten expenses that show up mid-month with no budget line. Expect at least one category that runs out in week two. All of that is normal and expected. The value of Month 1 is not getting things right — it is finding out specifically where the numbers are off. Every overage, every surprise, every category that blew past its limit is telling you something you need to know. Write it down. Month 2 uses that data.
Month 2: Adjustment (Refining Your Numbers)
Month 1 gave you the data. Month 2 is where you use it. If you budgeted $300 for groceries but spent $420, raise groceries to $420 and cut something else by $120. Work through each category that ran over and fix the amounts. By the end of Month 2, the budget should look noticeably more realistic than the one from Month 1. It may still not be perfect. But the pattern of which categories are consistently underestimated should be clear, and that is enough to make Month 3 significantly more accurate.
Month 3: Confidence (Your Budget Starts Working)
By Month 3, the budget is starting to actually reflect how you live rather than how you planned to live. Categories are close to right. Surprises are smaller. The weekly check-in takes fifteen minutes instead of forty-five. Financial discipline at this point stops being something you push through and starts being something that runs quietly in the background. You know what you have. You know what is claimed. You know what is genuinely available. That combination is what makes Month 3 different from Month 1 — not motivation, not willpower, just accurate numbers doing their job.
Pros and Cons of Zero-Based Budgeting (Is It Right for You?)
Zero-based budgeting is not the right method for everyone. It is the right method for a specific kind of person in a specific kind of situation. The pros are real, the cons are real, and knowing both upfront saves you from committing to a budgeting method that fights your natural habits from the start. I want to be direct about both.
Advantages of Zero-Based Budgeting
Complete financial awareness. You know exactly where every dollar goes. The vague $300 that used to vanish into the month now has a name on it.
Intentional spending. Every purchase was accounted for before the month started. When something is not in the budget, spending it means something else loses its allocation — and that is a decision, not an accident.
Faster debt payoff. Every unallocated dollar goes directly to debt rather than drifting into random spending. That intentional redirection adds up faster than most people expect.
Consistent goal funding. Savings goals get a line item every month. They get funded consistently, not only when something happens to be left over.
Subscription awareness. Building the budget forces a monthly review of every recurring charge and a conscious decision about whether each one stays.
Adaptability. A new expense or an income change gets handled in next month’s budget rebuild. Nothing gets ignored or buried.
Disadvantages of Zero-Based Budgeting
Time investment upfront. The first month takes several real hours — building the template, reviewing statements, estimating categories you have never tracked before. It is front-loaded effort that gets lighter quickly.
Requires consistent tracking. A budget left unchecked for three weeks does not work. The method requires weekly check-ins, not just a setup session at the start of the month.
Can feel constraining. When every dollar is assigned and an unexpected expense shows up, it can feel like the whole plan is collapsing. A miscellaneous buffer mostly solves this, but not entirely.
Learning curve frustration. Month 1 and Month 2 often feel like the budget is constantly wrong. They are supposed to feel that way. People who expect immediate results often quit before the categories have had two or three months to settle into accurate numbers.
Who Zero-Based Budgeting Works Best For
Zero-based budgeting fits best for people who feel like money disappears without explanation, who are actively working to pay off debt, who want to hit a specific savings target on a specific timeline, or who simply want complete visibility into every dollar at all times. It works particularly well for couples budgeting together because the shared spreadsheet creates a clear, shared record of every allocation decision.
People with highly variable income can make it work using the low-month strategy covered earlier in this article. Those who want less maintenance and are comfortable with approximate tracking will probably find the 50/30/20 rule or reverse budgeting easier to sustain over time. If you’re still exploring which budgeting method fits your habits best, reviewing budgeting basics can help you understand the core principles that work across all approaches.
Zero-Based vs. Other Budgeting Methods (50/30/20, Envelope, Reverse)
HEADING SUGGESTION: No change needed — parenthetical subtitle is already included.
Zero-based budgeting is not the only method that works. Three others come up consistently in personal finance discussions, and each fits a different type of person. Here is how they compare and where each makes more sense than the others.
Zero-Based vs. 50/30/20 Rule
The 50/30/20 rule splits income into three buckets: 50 percent for needs, 30 percent for wants, 20 percent for savings and debt. Setup takes about five minutes and there is minimal tracking required after that. The trade-off is precision you know which bucket money went into, not which specific expense it funded. Zero-based budgeting tells you exactly where every dollar landed. If the goal is finding spending leaks, paying off debt aggressively, or understanding exactly where a financial problem is hiding, zero-based wins. If you have stable income, no pressing debt, and just want a rough guide, the 50/30/20 budgeting method is simpler and that simplicity matters for long-term consistency.
Zero-Based vs. Envelope Budgeting
Envelope budgeting is cash only. Every spending category gets a physical envelope with the budgeted cash inside. When the cash runs out, spending in that category stops for the month. It is effective for impulse control in variable categories, which is why the hybrid approach described earlier works so well. The limitation is that envelopes cannot handle fixed bills, auto-pay, or online purchases without awkward workarounds. Zero-based budgeting covers all payment types. Pure envelope budgeting is a partial system. Combined with zero-based principles, it becomes complete.
Zero-Based vs. Reverse Budgeting (Pay Yourself First)
Reverse budgeting works in the opposite direction. The moment a paycheck lands, a fixed amount moves automatically to savings and investments. Whatever remains is yours to spend without tracking individual expense categories. It is simple and when automated, it runs itself. The limitation is that it does not tell you where your discretionary spending goes, which means hidden spending problems stay hidden. People who already have spending under control and want to automate their savings rate tend to do well with it. People who need to actively manage where every dollar goes, or who are paying down debt on a tight budget, will find zero-based budgeting more effective.
Best Tools and Apps for Zero-Based Budgeting in 2025
Every tool on this list has been used by real people to run zero-based budgets consistently. Some are free. Some have paid tiers worth considering. I am not promoting any of them — I am describing what each actually does well and where each falls short. App pricing and features change frequently, so verify current plans directly on each website before signing up.
Dedicated Zero-Based Budget Apps
EveryDollar is built around the Ramsey Solutions zero-based budgeting framework. The free version requires manual transaction entry. The paid version pulls bank transactions automatically. Clean, structured, and straightforward to start which makes it a practical first app for people new to the method. I used it for about eight months before switching to a Google Sheets setup that fit my specific tracking needs better.
YNAB (You Need A Budget) is more sophisticated. It connects to bank accounts, imports transactions, and operates on a slight variation of zero-based principles where you only budget money already in your account rather than projected income. It has a subscription cost. The learning curve is steeper than EveryDollar, but it is the tool I see advanced budgeters recommend most consistently once they work through the setup.
Goodbudget is a digital envelope system built on zero-based principles. No bank connection required, which makes it appealing for people who prefer not to link accounts. It works across devices, making it practical for couples who budget together.
DIY Spreadsheet Options
Google Sheets and Microsoft Excel are the most flexible options and both are free. The templates at the top of this article cover the full setup for both so you do not have to build from scratch. Spreadsheets are the most customizable option if you have an unusual income structure or categories that no app accounts for, you can add them in thirty seconds. The trade-off is that nothing is automatic. Transactions do not import. You enter everything manually. For people who want full control over their data and are comfortable with basic formulas, that trade-off is worth it.
Automation Tools to Support Your Budget
Automation does not replace budgeting. It removes the parts of execution that do not require decisions. Auto-pay for fixed bills means nothing slips because you forgot to log in. A savings transfer scheduled for the same day as your paycheck means that money moves before you see it in your available balance and before you spend it on something else. Some banks offer round-up savings that pull small amounts from each purchase automatically. None of these substitute for the monthly planning session. But they handle the mechanical execution so your budget time goes toward the categories that actually need thinking.
Frequently Asked Questions
Does a zero-based budget mean I’ll have zero dollars in my bank account?
No. The zero refers to the math on paper, not the balance in your account. Every dollar you earn gets assigned a purpose before the month starts some to bills, some to savings, some to debt. Your account still holds money. The difference is that none of it is floating around without a destination.
How long does it take to get good at zero-based budgeting?
Budget for three months before deciding whether it works for you. Month 1 gives you data about your actual spending. Month 2 uses that data to fix the category amounts. By Month 3, the numbers are close enough to reality that the budget actually guides decisions rather than just documenting what already happened.
What should I do if my expenses exceed my income in my zero-based budget?
Protect the Four Walls first: food, shelter, utilities, and transportation to work. Then go through every non-essential expense and cut aggressively. Subscriptions, memberships, dining out, anything that is not keeping the household running. If you cut everything possible and the gap is still there, the problem is income, not spending and that requires a different solution entirely.
Do I need to create a new zero-based budget every single month?
Yes. Your recurring bills may stay similar month to month, but no two months are identical. Car registration, school supplies, holiday spending, seasonal utility changes each month carries something the last one did not. A budget copied from last month is already inaccurate before the new month begins.
How do I handle irregular income with zero-based budgeting?
Build your budget around one of your lower-earning months, not your best one. When a higher month comes in, treat the extra as a bonus and assign it toward your emergency fund, debt, or savings goals. Do not treat a high-income month as the new baseline. The conservative baseline is what keeps the budget stable when income slows down.
What is the difference between an emergency fund and a miscellaneous budget category?
The miscellaneous category is a monthly buffer of $100 to $200 for small unexpected costs a forgotten fee, a minor repair, a small surprise. The emergency fund is a separate savings account holding three to six months of living expenses, ideally in a high-yield savings account where it earns interest while remaining easily accessible. It exists for serious disruptions: job loss, a large medical bill, a major home or vehicle problem. They are not interchangeable. You need both, and they serve completely different purposes.
What do I do when I overspend in one budget category mid-month?
Move money from a discretionary category to cover it. If dining went over by $40, pull that $40 from entertainment or shopping. The total budget balance stays at zero. The individual categories shifted. That is fine it is a deliberate trade-off, not a failure. If the same category runs over two or three months in a row, raise the budget amount permanently and find something else to reduce.
Should I start budgeting immediately or track my spending first?
If you have no clear picture of what you actually spend in a typical month, track first. Spend 30 days recording every purchase before building your first formal budget. Category amounts based on real past spending are far more accurate than guesses, and accurate categories are what make the budget hold together past the first week. Building a formal budget after tracking gives you the accurate baseline numbers that make learning how to create a zero based budget stick from the very first month.